Angular 18.1 - Create a simple login using Angular Material
Table of contents
We have some new project in our team... we need to learn about code into angular to create and i become some difficulties to get a rapid learning and creating.
As a team we trying to find some rapid tutorials about some functionality, the login was one and is so difficult to find we create this login using multiple web pages to bring the functionality we need in our project.
Create base project
First thing we need to do is to install NodeJS if not have on our computer, got the latest evrsion from official site: NodeJS Download.
Then install the latest version of angular.
npm install -g @angular/cli
Then following the documentation in angular official site, we need to create a project.
ng new <project-name>
You will be presented with some configuration options for your project. Use the arrow and enter keys to navigate and select which options you desire.
If you don't have any preferences, just hit the enter key to take the default options and continue with the setup.
After you select the configuration options and the CLI runs through the setup, you should see the following message:
✔ Packages installed successfully.
 Successfully initialized git.
At this point, you're now ready to run your project locally!, to do this we need to move into the project folder we created and then run the follow line on the terminal:
ng serve
After successfully loads the proyect you can go into http://localhost:4200/ to see your application running, now you see the follow view.

Install Angular Material
To install angular Material 18.1, we need to run the follow line on the terminal.
ng add @angular/material
Then the terminal ask you to: select the theme, select if you want to install globally the material font, and select if you want to install the Angular Material animations, the follow are the files this installation modify.
Add project dependencies to package.json
Add the Roboto font to your index.html
Add the Material Design icon font to your index.html
Add a few global CSS styles to:
Remove margins from body
Set
height: 100%on html and bodySet Roboto as the default application font
You're done! Angular Material is now configured to be used in your application.
Create login component
Now we need to create a new folder in the project inside folder /app called authentication

Then we need to create the new component, writing the follow line on terminal:
ng g c /authentication/login
And you see the follow output on the terminal:
CREATE src/app/authentication/login/login.component.html (21 bytes)
CREATE src/app/authentication/login/login.component.spec.ts (608 bytes)
CREATE src/app/authentication/login/login.component.ts (243 bytes)
CREATE src/app/authentication/login/login.component.scss (0 bytes)
The follow step in the component was to set the styles, i suggest the follow:
login.component.css
mat-card {
    max-width: 400px;
    margin: 2em auto;
    text-align: center;
}

mat-form-field {
    display: block;
}

.card-title {
    color: #646464;
}

:host {
    display: flex;
    flex-direction: column;
    align-items: flex-start;
}

footer {
    width: 100%;
    font-size: .9em;
    color: darkgray;
    text-align: center;
}
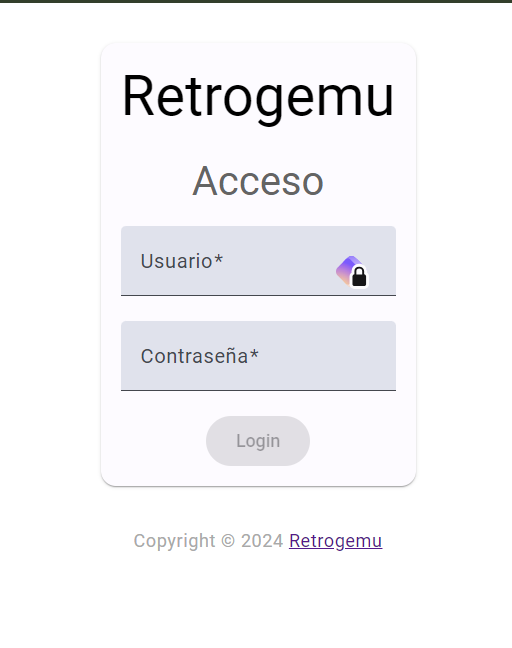
Also we add the follow html code to:
login.component.html
<mat-card>
    <mat-card-header>
        <h2>Sistema Soluciones Telcel</h2>
    </mat-card-header>
    <mat-card-content>
        <form #loginForm="ngForm" (submit)="login()">
            <h4 class="card-title">Acceso</h4>
            <mat-error *ngIf="!loginValid">
                El usuario y contraseña no son correctos!.
            </mat-error>
            <mat-form-field>
                <mat-label>Usuario</mat-label>
                <input matInput placeholder="Usuario" [(ngModel)]="user" name="username" required>
            </mat-form-field>
            <mat-form-field>
                <mat-label>Contraseña</mat-label>
                <input matInput type="password" placeholder="Contraseña" [(ngModel)]="password" name="password"
                    required>
            </mat-form-field>
            <button mat-raised-button color="primary" [disabled]="!loginForm.form.valid">Login</button>
        </form>
    </mat-card-content>
</mat-card>

<footer>
    Copyright © {{year}}
    <a href="#" rel="" target="_blank" title="Retrogemu">Retrogemu</a>
</footer>
And need to write the follow code on the latest file, this code have all the imports needed to get the angular material on the view, and handle the login functionality calling an API we created previously in our team or handle locally in our angular porject.
login.component.ts
import { Component, ChangeDetectionStrategy } from '@angular/core';
import { RouterOutlet, Router } from '@angular/router';
import { AuthService } from '../../core/services/auth.service';
import { FormsModule } from '@angular/forms';
import { CommonModule } from '@angular/common';
import { MatCardModule } from '@angular/material/card';
import { MatInputModule } from '@angular/material/input';
import { MatButtonModule } from '@angular/material/button';
import { MatFormFieldModule } from '@angular/material/form-field';

const materialModules = [
  RouterOutlet,
  FormsModule,
  CommonModule,
  MatCardModule,
  MatInputModule,
  MatButtonModule,
  MatFormFieldModule
];

@Component({
  selector: 'app-login',
  standalone: true,
  imports: [materialModules],
  templateUrl: './login.component.html',
  styleUrl: './login.component.css',
  changeDetection: ChangeDetectionStrategy.OnPush
})

export default class LoginComponent {
  user: string = '';
  password: string = '';
  loginValid: boolean = true;
  year: number = new Date().getFullYear();

  constructor(private authService: AuthService, private router: Router) {

  }

  login(): void {
    this.authService.login(btoa(this.user), btoa(this.password)).subscribe({
      next: () => {
        this.loginValid = true;
        this.router.navigate(['index']);
      },
      error: (err) => this.loginValid = false
    });
  }
}

Now we have a functional login for our project in Angular 18.1 and Angular Material 18.1, also have a user and password handler to send into API or local movement.
